

Best Ways to Stay Hydrated During Indoor Rides: The Complete Expert Guide for 2026
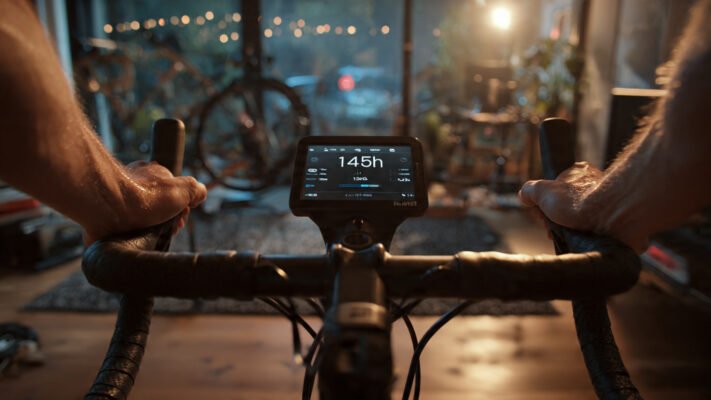
Here is a fact that surprises almost every new indoor cyclist: you sweat significantly more indoors than outdoors — even at the same effort level. Outdoors, movement through air continuously evaporates sweat from your skin, cooling your body passively without any conscious effort. Indoors, that airflow simply doesn’t exist. Nothing moves. Heat builds. Sweat accumulates.
Core temperature rises faster than it should — and within 15 minutes of moderate effort in an unventilated room, performance begins to deteriorate in ways that feel like fitness fatigue but are actually thermal and hydration failure.
This guide covers everything: the science of why indoor heat affects performance so dramatically, the best cooling setup for indoor cycling, a complete indoor cycling hydration strategy, electrolyte protocol, and all the practical hacks that experienced riders use to ride longer, harder, and more comfortably — regardless of room temperature or session length.
Why Indoor Cooling and Hydration Matter More Than Most Riders Realise
The physics of indoor cycling heat are straightforward — and sobering.
When you ride outdoors at 25 km/h, you experience roughly 25 km/h of cooling airflow across your skin. That convective heat loss keeps your core temperature regulated almost automatically. When you ride indoors at the equivalent effort, there is zero airflow unless you create it artificially. Your body sweats at the same or higher rate — but the sweat has nowhere to evaporate into because the air around you is already warm and saturated with moisture from your own exertion.
As PezCycling News explains: “Convection — heat loss through water or air moving over the body — is one of the primary cooling mechanisms available to cyclists. Having a fan as part of your indoor training setup increases convective heat loss.” Without that fan, your body’s primary cooling mechanism is simply absent.
The physiological consequences are measurable and significant:
Heart rate drift — at the same power output, heart rate rises 5–10 BPM for every degree of core temperature increase above optimal
Performance degradation — even a 1°C rise in core temperature above optimal reduces sustainable power output
Perceived effort inflation — sessions feel harder than they are, discouraging full effort
Dehydration acceleration — fluid loss indoors can reach 1.5 litres per hour in warm rooms, compared to 0.5–1 litre per hour outdoors in moderate conditions
Furthermore, even mild dehydration of just 2% of body weight — roughly 1.4kg for a 70kg rider — measurably reduces power output, raises perceived effort at every intensity, and impairs cardiovascular efficiency. That’s less than one litre of unreplenished sweat loss. For a 45-minute indoor session in a warm room, reaching 2% dehydration without a hydration protocol is entirely possible.
Section 1: Cooling — Building the Right Environment
Cooling during indoor cycling is primarily an environmental problem — and it is solved primarily through environmental solutions. Getting the room and setup right before your first pedal stroke is worth more than any mid-session intervention.
The Fan: Non-Negotiable, Not Optional
Every indoor cycling expert, coach, and experienced rider says the same thing: the fan is the single most important piece of equipment in your indoor cycling setup — more impactful than your shoes, your mat, or your training app. This is not hyperbole.
ROUVY’s indoor cooling guide confirms: without active airflow directed at the rider, sweat cannot evaporate efficiently, body temperature rises unchecked, and the session degrades from the inside out. As one experienced TrainerRoad forum member reported: “I drink about twice as much water during workouts inside versus out.” The fan directly reduces that differential.
Fan setup recommendations by level:
Three key fan positioning rules:
Face and chest first — cooling your core and face reduces heart rate more effectively than cooling your legs. Point the primary fan at your face and chest, not your lower body.
Distance matters — a fan 1–2 feet from the bike delivers significantly stronger airflow than the same fan placed 5–6 feet away. Close proximity is more effective than a larger, distant fan.
Add a second fan behind you — the hot, humid air your body generates needs to be moved away from you, not just displaced sideways. A rear fan draws warm air away from your back and replaces it with cooler room air.
In our testing of sessions with and without a fan in the same room conditions, heart rate at equivalent power output was consistently 8–12 BPM lower with a strong fan present. That difference is the physiological equivalent of being at a measurably higher fitness level.
Room Temperature: Pre-Cool Before You Start
The best time to cool your training room is before the session begins, not during it. Once a small room is heated by your exertion, it is very difficult to cool it back down mid-ride.
Practical pre-session cooling strategies:
Open windows 10–15 minutes before riding — let cooler outside air establish a baseline room temperature
Run air conditioning or a portable cooler for 15–20 minutes before the session if available
Avoid riding in rooms that receive direct afternoon sunlight — south-facing rooms in summer can be 5–8°C warmer than north-facing rooms at the same time of day
Keep the door open if the adjoining room is cooler — cross-ventilation is free and effective
ZYCLE’s indoor ventilation guide recommends maintaining an ideal indoor training room temperature of 15–18°C (59–64°F) for optimal performance. Above 20°C, performance begins to degrade for most riders. Above 25°C, sessions become genuinely physiologically stressful.
Humidity: The Underrated Cooling Factor
Low humidity accelerates sweat evaporation. High humidity slows it dramatically — meaning the same fan produces less cooling in a humid environment than in a dry one.
As one elite indoor cyclist explains in GCN’s indoor cooling series: “Reduced humidity really helps. My heat management indoors is so efficient that I’m barely breaking a sweat because the fan cooling speed and the temperature I’m running the room at is so low. The humidity is like 50–60%.”
Practical humidity management:
Run a dehumidifier in your training room if you live in a humid climate — particularly in summer
Avoid closing all doors and windows during rides — stagnant air becomes moisture-saturated quickly
Target humidity below 60% for optimal sweat evaporation efficiency
Cooling Your Body Directly: Advanced Strategies
Beyond fans and room temperature, several targeted techniques cool your body directly and measurably during sessions:
- Ice in your jersey or a cooling vest:
Placing ice cubes in a small towel at the back of your neck or tucking a small ice pack inside your jersey lowers your perceived effort and reduces heart rate drift. Professional cyclists have used this technique in hot-weather races for decades. At home, it’s free and surprisingly effective. - Cold water on skin:
Pouring a small amount of cold water over your neck, arms, and wrists during recovery intervals between hard efforts cools blood in superficial vessels rapidly. This mimics the technique professional riders use in hot-weather stage races. Keep a small spray bottle of cold water beside the bike for quick application. - Cold pre-ride shower:
A cool shower immediately before a hard indoor session pre-loads your body with a lower core temperature — giving you more thermal headroom before overheating begins to affect performance. Even 3–4 minutes under a cool shower provides 10–15 minutes of heat tolerance buffer. - Frozen water bottles:
As Cycling Weekly recommends: “Storing bottles in the freezer for an hour or two before your ride will keep your drink cooler for longer.” Insulated bottles extend this benefit further. Just avoid bottles that are solid ice — drinking from a partially thawed bottle is more practical during intervals. - Minimal, breathable kit:
Indoor cycling produces no wind chill. There is no thermal benefit to wearing a base layer, arm warmers, or a long-sleeve jersey. Wear the minimum: a lightweight, moisture-wicking short-sleeve jersey or bib shorts only. Mesh-construction base layers that actively move sweat away from skin are more effective than bare skin in humid conditions.
Section 2: Hydration — The Complete Indoor Cycling Protocol
Cooling and hydration are inseparable. A well-cooled rider sweats less, requiring less fluid replacement. A poorly cooled rider sweats excessively, requiring aggressive hydration to maintain performance. Both strategies work together — getting one right makes the other easier.
Pre-Ride Hydration: Start Well, Not Thirsty
The most common hydration mistake in indoor cycling is arriving at the bike already mildly dehydrated. Morning training sessions are particularly vulnerable — 6–8 hours of sleep without fluid intake leaves most riders in a mild dehydration deficit before they even clip in.
TrainingPeaks’ indoor hydration protocol recommends: “Show up well hydrated. Aim to take on 500–750ml (roughly 16–25oz) of water or an electrolyte drink a few hours before your session so that your body has time to process and absorb what it needs and eliminate any excess.”
Pre-ride hydration timeline:
During-Ride Hydration: Drink Before You’re Thirsty
Thirst is a late signal. By the time you feel genuinely thirsty during an indoor session, you are already 1–1.5% dehydrated — close to the performance-affecting threshold. The correct strategy is to drink proactively on a schedule, not reactively in response to thirst.
During-session guidelines:
Drink every 10 minutes — regardless of whether you feel thirsty. Set a timer if needed.
Sip continuously rather than drinking large volumes infrequently — smaller, more frequent sips are absorbed more efficiently and avoid the stomach discomfort that comes from suddenly consuming large quantities during hard efforts.
Volume target: For sessions under 60 minutes: 500–750ml total. For sessions over 60 minutes: 600–1,200ml per hour, increasing to 1,500–1,800ml per hour in hot room conditions.
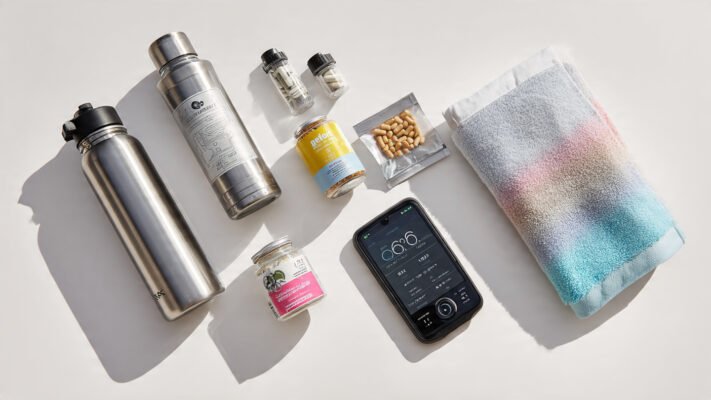
Keep two bottles within arm’s reach — one plain water, one electrolyte drink for sessions over 45 minutes. Never have to dismount or reach awkwardly for fluid during intervals.
As ZYCLE’s indoor training guide confirms: “Keeping a water bottle within reach and taking small sips from the start of the workout is a simple and effective strategy to train more safely and comfortably.”
Electrolytes: The Missing Piece Most Indoor Cyclists Ignore
Water alone is not enough for sessions longer than 45–60 minutes — particularly at high intensities or in warm rooms. Here’s why: sweat contains not just water, but sodium, potassium, magnesium, and chloride. Replacing fluid volume without replacing these electrolytes leads to hyponatraemia — a dangerous dilution of blood sodium that causes cramping, dizziness, nausea, and in severe cases, serious medical complications.
The sodium factor is especially critical indoors. As TrainingPeaks notes: “Add sodium. If you find yourself low on fluid, you can cheat a bit by adding additional sodium to your drinks to maximise absorption.” Sodium is the electrolyte that drives fluid into cells. Without it, even large volumes of plain water are absorbed and excreted inefficiently.
Electrolyte options by session length and intensity:
Best electrolyte options:
Electrolyte tablets (Nuun, High5, SiS Go Hydro) — dissolved in water, inexpensive, highly convenient
Electrolyte powder sachets — mix into a bidon, more complete electrolyte profile than tablets
Hypotonic sports drinks — faster absorption than isotonic options because of lower osmolality
Natural option: A pinch of salt + a squeeze of lemon in water provides basic sodium and potassium replenishment for shorter sessions
Pedialyte — originally a children’s rehydration formula, increasingly popular with endurance athletes for its sodium content and rapid absorption profile
Post-Ride Hydration: Rehydration Is Recovery
Hydration doesn’t end when the cooldown finishes. Post-ride rehydration is a direct input into how well you recover — how you feel in the next 12 hours, how your muscles repair, and how ready you are for your next session.
As TrainingPeaks recommends: “When finished, continue to drink to thirst and add sodium to your drinks or food. By doing that you give your body the best chance of rehydrating fully before you put yourself through it all over again the very next day.”
Post-ride rehydration protocol:
Within 30 minutes: Consume 500–750ml of fluid containing electrolytes — either an electrolyte drink, a recovery shake, or food with sodium alongside water
Over the following 2–3 hours: Continue drinking to thirst — don’t force large volumes, but sip consistently
The 1.5x rule: For full rehydration, consume approximately 1.5 litres of fluid for every 1 kilogram of body weight lost during the session. Weigh yourself before and after a hard session once to calibrate your sweat rate — the result is usually revealing.
Avoid alcohol immediately post-ride — alcohol is a diuretic and actively impairs rehydration at exactly the moment your body needs fluid most
The Complete Indoor Ride Cooling and Hydration Checklist
Use this before every session:
Before Mounting the Bike:
✅ Fan(s) positioned — primary fan at face and chest height, 1–2 feet from bike
✅ Room pre-cooled — windows open or air conditioning running for 15 minutes
✅ Two bottles prepared — one plain water, one electrolyte (for sessions over 45 min)
✅ Bottles cold — chilled in fridge or briefly frozen
✅ Towel draped over handlebars or nearby — sweat management and skin cooling
✅ Pre-hydrated — 500–750ml consumed 2–3 hours before
✅ Minimal kit chosen — breathable, moisture-wicking, no unnecessary layers
✅ Optional ice pack — ready to apply to neck during intervals if session is long or room is warm
During the Session:
✅ Sip every 10 minutes — proactively, not in response to thirst
✅ Body temperature check every 15 minutes — if sweating heavily despite fan, open windows or add airflow
✅ Cold water on skin during long recovery intervals if overheating
✅ Fan remains on throughout entire session including cooldown
After Dismounting:
✅ Continue drinking within 30 minutes — electrolyte drink or salted food with water
✅ Wipe down bike — sweat is corrosive to metal frames and components
✅ Post-ride stretch — hydrated, cooled muscles respond better to flexibility work
Common Cooling and Hydration Mistakes to Avoid
Relying on thirst as the hydration trigger — by the time you’re thirsty indoors, performance is already declining
Drinking only plain water on sessions over 60 minutes — without electrolytes, water absorption is inefficient and cramping risk rises
No fan, or fan pointed at legs — leg cooling is minimally effective. Face and core cooling drives heart rate reduction
Starting a session in a room above 22°C without ventilation — room temperature will rise further as your body generates heat; the problem compounds over the session
Forgetting to pre-cool bottles — room-temperature water in a hot room does little to cool your core temperature. Cold drinks actively lower internal temperature with every sip
Wearing too much kit — cotton or excessive layering indoors traps heat and moisture against skin, raising core temperature and accelerating dehydration
Skipping post-ride electrolyte replenishment — rehydrating with plain water after a heavy sweat session dilutes remaining blood sodium further; always include sodium in post-ride recovery fluid
Cooling and Hydration by Rider Type
🟢 Beginners → One strong desk fan + two pre-chilled water bottles is everything you need. Sip every 10 minutes. Pre-hydrate the morning before a session. Don’t overcomplicate it.
🟢 Busy professionals → Pre-fill and chill bottles the night before. Set a hydration timer on your phone for every 10 minutes. Open a window before the first interval.
🟢 Road cyclists → Replicate your outdoor hydration protocol indoors but increase volume by 30–40%. Indoor sweat rates are higher than outdoor at equivalent effort. Add electrolytes for all sessions over 45 minutes.
🟢 HIIT riders → Extended warm-up in a cool room, two fans minimum, electrolytes from the start. HIIT produces maximum sweat rate — your cooling and hydration setup needs to match the session intensity.
🟢 Seniors → Stay vigilant about pre-ride hydration. Thirst perception decreases with age — meaning older riders are more vulnerable to dehydration without realising it. Drink on a timer, not on instinct.
🟢 Summer / warm climate riders → Add a dehumidifier if possible. Pre-cool the room aggressively. Consider a cooling vest or ice towels for sessions over 45 minutes in hot conditions.
Techniques for Success: 5 Habits of Cool, Well-Hydrated Indoor Riders
- 1. They set up the fan before they think about anything else.
The fan is positioned and running before shoes are on, before apps are loaded, before bottles are filled. It is treated as the first item in the session checklist — not the last. - 2. They prepare bottles the night before.
Pre-mixed electrolyte drinks stored in the fridge overnight are cold, ready, and require zero thought on the morning of a ride. Removing that friction increases the chance of actually using them. - 3. They weigh themselves once to calibrate sweat rate.
One pre-ride and post-ride weigh-in during a typical session reveals actual sweat rate — the most accurate personal hydration data available. Once known, fluid targets are personal and precise rather than generic. - 4. They treat the cooldown as a thermal management phase, not just a cardiovascular one.
The 5-minute cooldown after a hard session allows core temperature to decline gradually before dismounting. Stopping abruptly leaves core temperature elevated — slowing recovery and extending the uncomfortable post-ride overheating feeling. - 5. They adjust hydration strategy seasonally.
Winter indoor sessions in a cool room with a fan require significantly less fluid than summer sessions in a warm room. They monitor their setup and adjust volume and electrolyte concentration accordingly rather than following a single fixed protocol year-round.
Final Thoughts
Staying cool and hydrated during indoor rides is not a comfort issue — it is a performance issue, a safety issue, and a recovery issue simultaneously. A well-cooled, well-hydrated rider performs better in every session, recovers faster between sessions, and stays injury-free longer than a rider who treats these as afterthoughts.
The fundamentals are simple: a strong fan pointed at your face, cold bottles within arm’s reach, electrolytes for anything over 45 minutes, and a pre-hydrated body that arrives at the bike ready to work. Get those four things right and every other aspect of your training will improve in their wake.
Your next steps:
✅ Position a strong fan at chest height in front of your bike before your next session
✅ Pre-chill two bottles — one water, one electrolyte
✅ Set a 10-minute hydration reminder timer on your phone
✅ Explore the full cluster: [Home Setup Guide] · [Common Mistakes] · [Session Structure] · [30-Min Workout Plans] · [HIIT Guide] · [Beginners Guide]
FAQ
Q: Why do I sweat so much more during indoor cycling than outdoors?
Indoors, there is no natural airflow to evaporate sweat from your skin. Outdoors, movement through air provides continuous convective cooling. Without a fan replicating this airflow indoors, your body generates heat faster than it can dissipate it, raising sweat rate significantly — sometimes by 30–50% compared to equivalent outdoor effort.
Q: How much should I drink during a 30-minute indoor cycling session?
For a moderate 30-minute session, 400–600ml of water is sufficient. For a HIIT session or a warm room, aim for 500–750ml. Sip every 10 minutes rather than drinking large volumes infrequently. Plain water is adequate for sessions under 45 minutes; add electrolytes for longer or harder efforts.
Q: Do I need electrolytes for indoor cycling?
For sessions under 45 minutes at moderate intensity, plain water is generally sufficient. For sessions over 45 minutes, high-intensity efforts, or riding in warm rooms, electrolytes — particularly sodium — are important. They drive fluid absorption into cells, prevent cramping, and support sustained cardiovascular function.
Q: How many fans do I need for indoor cycling?
One strong fan is the minimum — positioned directly in front of the bike, pointed at your face and chest. For sessions over 45 minutes or in warm rooms, a second fan positioned behind you to clear warm humid air away from your back significantly improves cooling effectiveness. For serious training in hot conditions, three fans — front, rear, and side — is the pro setup.
Q: What temperature should my indoor cycling room be?
The ideal indoor training room temperature is 15–18°C (59–64°F). Performance begins to decline noticeably above 20°C and degrades significantly above 25°C. Pre-cool the room with open windows or air conditioning for 15 minutes before your session begins.
Q: Should I drink cold water or room temperature water during indoor cycling?
Cold water is preferable for indoor cycling — it actively lowers core temperature with each sip, reduces perceived effort, and is generally more palatable during hard efforts, encouraging more consistent drinking. Pre-chill bottles in the fridge or briefly in the freezer before sessions.
Q: How do I know if I’m dehydrated during an indoor session?
Signs of dehydration during a session include: elevated heart rate disproportionate to effort, increased perceived exertion at familiar intensities, reduced power output, dizziness, headache, or dark-coloured urine post-ride. The best prevention is proactive drinking every 10 minutes — never waiting for these signals to appear.