
Most Common Indoor Cycling Mistakes: What You’re Doing Wrong and Exactly How to Fix It.
Every indoor cyclist makes mistakes. Beginners make them because they don’t yet know better. Experienced riders make them because bad habits quietly embed themselves over hundreds of sessions until the consequences — knee pain, lower back strain, plateau, or burnout — finally force attention.
This guide covers every common indoor cycling mistake that matters: the ones that cause injury, stall progress, and make riding unnecessarily uncomfortable. More importantly, it gives you the precise fix for each one — so every session from this point forward is safer, more effective, and more enjoyable.
Why Mistakes Matter More in Indoor Cycling Than You Think
Here is the honest truth about indoor cycling errors: because you ride the same bike, in the same position, with the same movement pattern, session after session — every mistake is repeated identically every single ride. There is no variation in road surface, position, or movement to distribute the load differently.
A saddle set 2cm too low on an outdoor bike might cause mild discomfort occasionally. The same saddle set 2cm too low on your home spin bike causes cumulative knee stress across every session, every week, until it becomes a genuine injury.
Furthermore, Cyclingnews‘ indoor cycling mistake analysis confirms that even experienced riders consistently fall into the same traps — overheating, poor bike setup, and training without structure being the most universal offenders across all levels.
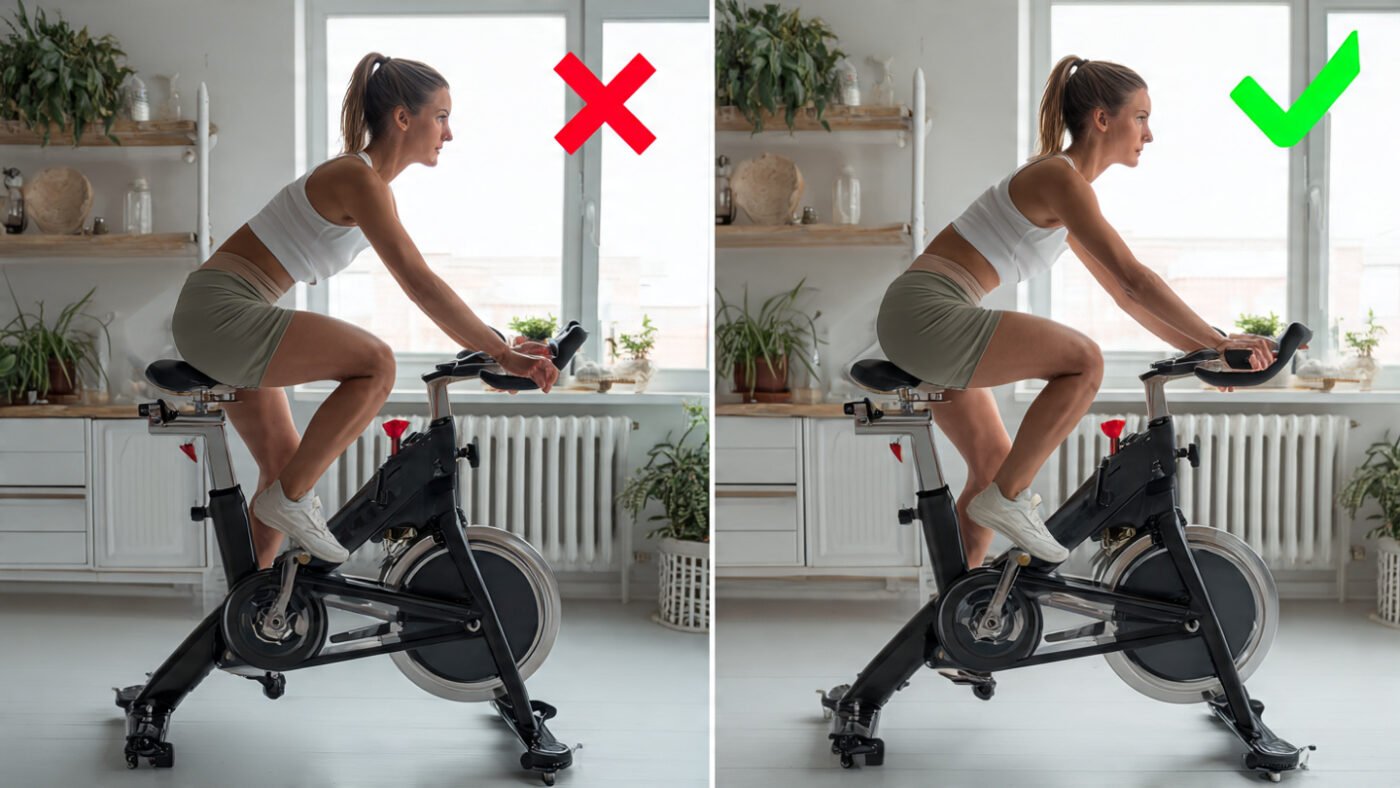
Mistake #1: Incorrect Bike Setup — The Root of Almost Every Problem
What goes wrong: The saddle is too low. The handlebars are too high or too low. The fore-aft saddle position is off. Any one of these errors alone creates discomfort and inefficiency. Combined, they create a riding position that is actively working against you on every pedal stroke.
The symptoms of poor setup:
Knee pain above or below the kneecap → saddle too low or too high
Lower back pain → handlebars too low or reach too long
Hip rocking side to side → saddle too high
Neck and shoulder tension → handlebars too low, causing hunching
Wrist pain → too much weight on hands, core not engaged
The fix — 4-point setup check:
- 1. Saddle height: Stand beside the bike and raise the saddle to hip bone height. Sit on the bike — at the bottom of the pedal stroke, your knee should have a 25–35 degree bend. Never fully locked out, never deeply bent.
- 2. Saddle fore/aft: Pedals level at 3 and 9 o’clock. Your front knee should sit directly over the pedal axle — not in front of it, not behind it.
- 3. Handlebar height: For beginners and anyone with lower back sensitivity, keep bars at saddle height or slightly above. Lowering bars is an advanced adjustment — earn it gradually as core strength develops.
- 4. Reach: Arms should be slightly bent — never locked straight. If you’re stretching forward with locked arms, move the saddle forward or raise the bars. Locked arms create upper body tension, waste energy, and cause shoulder strain session after session.
- Pro tip from our testing: In our experience assessing home cycling setups, the single most common error was a saddle set 3–5cm too low. The rider thought it felt safe. In reality, it was loading their knee joint on every stroke. A 2-minute adjustment completely eliminated the issue.
Mistake #2: Riding with Tension — The Death Grip and the Hunched Back
What goes wrong: Many riders grip the handlebars as if they’re bracing for a crash — what certified trainer Melanie Melillo, CPT, calls “the death grip or the white knuckle.” Others let their shoulders rise toward their ears, hunch their upper back, and lock their elbows straight. All of this is wasted energy and accumulated strain.
Why it happens: Tension is a natural stress response. When effort increases — especially during hard intervals — the body instinctively braces everywhere, not just where it’s needed. Without conscious correction, this tension becomes habitual.
The consequences:
Tight grip → hand numbness, wrist strain, forearm fatigue
Raised shoulders → neck pain, upper back tension, headaches post-ride
Rounded back → reduced breathing efficiency, lower back pain on longer sessions
Locked elbows → poor shock absorption, shoulder joint stress
The fix: Before each session, do a deliberate body scan. Grip the bars the same way you’d hold a paper cup without crushing it. Drop your shoulders consciously.
Soften your elbows into a slight bend. Keep your chest open and your spine in a neutral position — not arched forward, not hunched. Check in with this body scan every 5–10 minutes during the session, particularly during hard efforts when tension naturally creeps back in.
Mistake #3: Riding with Zero or Too Little Resistance
What goes wrong: Riders spin at 110+ RPM with virtually no resistance. It feels fast. It looks impressive. It achieves almost nothing — and it actively damages your knees.
The consequences of zero resistance:
Uncontrolled knee movement on every stroke — no muscular engagement to stabilise the joint
Zero cardiovascular training stimulus — heart rate stays artificially low for the effort level
Hip bouncing — pelvis rocks side to side causing lower back strain
Saddle chafing — uncontrolled movement increases friction against the saddle
The fix: Always maintain enough resistance that the pedal stroke feels smooth and controlled. Your hips should be completely still in the saddle. The stroke should feel circular and deliberate, not chaotic. As a rule: if you’re bouncing, add resistance immediately until the bounce stops. Base resistance — the minimum safe level — should always be present from the first pedal stroke to the last.
Mistake #4: Overheating and Dehydration — The Hidden Performance Killer
What goes wrong: Riders fail to account for the fundamental difference between indoor and outdoor cycling: indoors, there is no wind chill. Outdoors, movement through air keeps your core temperature regulated passively. Indoors, nothing moves except you — and your body temperature rises unchecked.
The consequences:
Heart rate climbs disproportionately to effort — sessions feel harder than they should
Power output drops progressively across the session
Post-ride grogginess, headaches, and prolonged recovery
Even mild dehydration (2% of body weight) measurably reduces performance
The fix: A strong fan pointed directly at your face and chest is non-negotiable — not optional, not a luxury. Position it within 1–2 feet of the front of the bike at chest height. Keep a minimum of two water bottles within arm’s reach and sip every 10 minutes regardless of whether you feel thirsty. Open a window where possible. Keep the room cool before you start.
Mistake #5: Skipping the Warm-Up
What goes wrong: Riders clip in and immediately push hard — skipping the warm-up entirely or “warming up” for 90 seconds before launching into a HIIT block. Cold muscles, cold joints, and an un-primed cardiovascular system are then subjected to maximum effort demands.
The consequences:
Elevated injury risk — cold muscle tissue has reduced elasticity and blood flow
Poor performance in the main block — the aerobic energy system hasn’t been activated
Heart rate spikes unpredictably in the first minutes of effort
Increased muscle soreness the following day
The fix: Always begin with 5–8 minutes of easy pedaling at 80–85 RPM with light resistance. Gradually increase effort over the warm-up — never jump to hard intensity before minute 5. For HIIT sessions, extend the warm-up to 8–10 minutes. The warm-up is not wasted time before the real work. It is the first phase of the session.
Mistake #6: Skipping the Cooldown
What goes wrong: The main block ends and the rider immediately dismounts. No gradual intensity reduction, no post-ride stretch, no recovery protocol.
The consequences:
Cardiovascular stress — blood pools in working muscles without the gradual redistribution a cooldown provides
Lightheadedness or dizziness immediately post-ride
Significantly elevated next-day muscle soreness
Impaired recovery meaning the next session starts from a higher fatigue baseline
The fix: Spend a minimum of 5 minutes reducing resistance and cadence gradually after every session. Then dismount and perform a targeted stretch: quads, hamstrings, hip flexors, calves, and lower back. Five minutes. Every single session. It directly reduces soreness, improves flexibility over time, and prepares your body for the next ride.
Mistake #7: Riding Through Pain
What goes wrong: Riders experience knee pain, lower back ache, or saddle soreness — and push through it, assuming it will resolve on its own with continued riding.
The consequences: Pain during riding is a signal. Ignoring it converts a correctable fit or form issue into a genuine overuse injury — the kind that requires weeks or months of rest rather than a 5-minute adjustment.
The fix: Stop. Diagnose. Adjust. The pain location tells you exactly what to change:
Mistake #8: No Training Structure — Just Riding
What goes wrong: Riders hop on the bike three times a week and simply pedal — no warm-up plan, no defined effort targets, no cadence intention, no progression. Every session feels roughly the same. Results come quickly at first, then plateau.
Why it happens: Structure feels complicated. Improvising feels free. But without structure, you’re producing random stimulus — and the body adapts to random stimulus inconsistently.
The fix: Every session needs a defined goal before you clip in. Choose one: endurance, strength, or HIIT. Set your cadence and resistance targets for each phase. Follow a warm-up, main block, and cooldown structure every time. Even the simplest pre-written template — like the beginner endurance plan in this cluster — produces dramatically better results than improvised riding.
Mistake #9: Overtraining — Training Too Hard, Too Often
What goes wrong: Motivated riders — particularly beginners experiencing rapid early progress — push too hard too often. They attempt HIIT every day. They skip rest days. They increase volume and intensity simultaneously. They mistake soreness for progress.
The consequences:
Accumulated fatigue — each session starts from a higher baseline of tiredness
Performance plateau — the body cannot adapt without recovery time
Elevated injury risk — overused tendons and joints signal distress through persistent soreness
Burnout — physical exhaustion becomes psychological disengagement from training
The fix: Follow the 10% rule — never increase weekly training volume by more than 10% in any given week. Limit HIIT sessions to a maximum of two per week with 48 hours of recovery between them. Schedule at least one full rest day per week. Include a deload week every four weeks — same frequency, 50–60% intensity — to allow accumulated fatigue to clear and adaptation to consolidate.
Mistake #10: Wearing the Wrong Kit
What goes wrong: Riders wear loose gym shorts, cotton t-shirts, and regular trainers — and then wonder why they experience saddle soreness, hot foot, and general discomfort that makes every session harder than it needs to be.
The consequences:
Cotton clothing holds sweat against skin — causing chafing and irritation
Loose shorts without chamois padding cause saddle soreness within 20 minutes
Regular trainers have soft flexible soles that cause hot foot — burning sole discomfort from pressure on the pedal platform
No cleat engagement means power transfer is inefficient — you push the pedal down but don’t pull it up
The fix: Three equipment upgrades transform riding comfort immediately:
Padded cycling shorts with chamois (~$25–$60) — the single most impactful purchase you can make for indoor cycling comfort
Moisture-wicking base layer — any synthetic fabric that moves sweat away from skin
Cycling shoes with SPD or Look cleats (~$60–$150) — clips into the pedal for full 360-degree power transfer and eliminates hot foot completely
Mistake #11: Ignoring Cadence and Riding “However Feels Right”
What goes wrong: No cadence awareness. Riders pedal at whatever speed feels natural — which typically means inconsistent, unstructured effort that varies wildly within and between sessions.
The consequences:
No repeatable training stimulus → no measurable adaptation
Sessions feel different every ride for no identifiable reason
Progress is random rather than directional
The fix: Set a cadence target before every session and track it. For endurance rides: 85–90 RPM. For strength/climbing: 60–75 RPM. For sprints: 100–110 RPM. Consistency in cadence targeting is what turns random pedaling into structured training.
Mistake #12: Incorrect Foot Position
What goes wrong: Riders place the arch or heel of the foot over the pedal axle rather than the ball of the foot. This small misalignment fundamentally changes force distribution through the ankle, knee, and hip.
The fix: Before your first pedal stroke of every session, consciously position the ball of your foot over the pedal axle. If using clip-in shoes, check cleat position — misaligned cleats are a primary cause of knee pain that most riders never consider.
Mistake #13: Comparing Indoor Performance Directly to Outdoor Cycling
What goes wrong: Road cyclists jump on an indoor trainer expecting their outdoor performance to translate directly — and feel demoralised when it doesn’t. Or conversely, they assume strong indoor numbers mean they’re ready for outdoor performance without the additional skills outdoor riding demands.
The reality: Indoor cycling eliminates wind resistance, road surface variation, cornering, and coasting — meaning power outputs and heart rates at equivalent perceived efforts differ between indoor and outdoor riding. Most cyclists find indoor riding feels significantly harder at equivalent power outputs compared to outdoor cycling.
The fix: Treat indoor and outdoor performance as related but distinct metrics. Use indoor training to build specific physiological qualities — aerobic base, threshold power, interval capacity — rather than chasing identical power or speed numbers to outdoor benchmarks.
Mistake #14: Never Maintaining the Bike
What goes wrong: Belt squeaks. Resistance feels inconsistent. Bolts have loosened. Firmware hasn’t been updated in six months. Most riders never check any of these things until a session is ruined by a preventable mechanical issue.
The fix: A simple monthly checklist takes 10 minutes and prevents 90% of mechanical problems:
✅ Check and tighten all bolts — frame, saddle clamp, handlebar clamp
✅ Lubricate the belt or chain with appropriate lubricant
✅ Wipe down the frame — sweat is corrosive to metal and painted surfaces
✅ Check firmware updates for smart trainers and connected bikes
✅ Inspect the flywheel and resistance unit for unusual sounds or inconsistent response
Quick-Reference Mistake Correction Guide
Techniques for Success: 6 Habits of Mistake-Free Riders
- 1. They do a 4-point bike fit check every time they change riders or adjust the bike.
Saddle height, fore/aft, handlebar height, reach. Four checks. Two minutes. Every fit problem is caught before a single pedal stroke is taken. - 2. They do a full body scan every 10 minutes during the session.
Hands relaxed? Shoulders down? Spine neutral? Elbows soft? Core engaged? This 10-second mental checklist, repeated every 10 minutes, prevents tension accumulation that would otherwise build invisibly across a 30-minute session. - 3. They treat pain as information, not inconvenience.
When something hurts, they stop and identify the cause before continuing. They understand that discomfort during fitness adaptation is normal. Pain in a joint or connective tissue is not. - 4. They never skip the fan.
This is treated as a hardware requirement, not an optional comfort item. The fan goes on before the session starts, every time, regardless of room temperature. - 5. They structure every session in advance.
The session type — endurance, strength, or HIIT — is decided before mounting the bike. Cadence targets and resistance intentions are set. The warm-up, main block, and cooldown are planned. Random riding is replaced by deliberate training. - 6. They respect recovery as part of the training plan.
Rest days, deload weeks, and cooldowns are not skipped or shortened. They understand that adaptation happens during recovery — not during the session itself. Training is the stimulus. Rest is where the results actually materialise.
Final Thoughts
The most common indoor cycling mistakes are almost all correctable in under five minutes — but only if you know what to look for. Bad bike fit, zero resistance, missing warm-ups, skipping cooldowns, wrong kit, no structure, and ignored pain signals are the seven factors that collectively account for the vast majority of indoor cycling injuries, plateaus, and dropped training habits.
Fix the fit. Add the resistance. Warm up and cool down every single time. Get padded shorts. Respect rest. Structure every session. Those six corrections alone will transform your indoor cycling experience — more enjoyable, more effective, and significantly safer.
Your next steps:
✅ Do a 4-point bike fit check before your next session
✅ Get padded cycling shorts before your next long ride
✅ Set up your fan permanently in front of the bike
FAQ
Q: What are the most common indoor cycling mistakes beginners make?
The top five are: saddle set too low, riding with too little resistance causing bouncing, gripping the handlebars too tightly, skipping the warm-up, and not using a fan. All five are correctable in under 10 minutes and make an immediate, measurable difference to comfort and performance.
Q: Why does my lower back hurt after indoor cycling?
Lower back pain during or after indoor cycling almost always traces to handlebar position — either too low, creating excessive forward lean, or with too much reach, overextending the lumbar spine. Raise the handlebars, shorten the reach, and engage your core during the session rather than resting weight on your hands.
Q: Why do my knees hurt when cycling indoors?
Knee pain above the kneecap means the saddle is too low. Pain behind the knee means it’s too high. Pain on the outside of the knee often indicates a cleat alignment issue. Adjust saddle height first — raise it if pain is at the front, lower it if pain is at the back — and recheck after two sessions.
Q: Is bouncing on a spin bike bad?
Yes. Bouncing is caused by insufficient resistance and indicates the pedal stroke is uncontrolled. It creates repetitive hip rocking that stresses the lower back, uncontrolled knee movement that strains the joint, and increases saddle friction causing soreness. Add resistance until the bounce stops immediately.
Q: How do I fix saddle soreness from indoor cycling?
Padded cycling shorts with a chamois insert resolve most saddle soreness immediately — they are the single most effective solution. Additionally, check saddle tilt (a downward-tilted nose causes forward sliding and friction) and saddle height. Standing briefly for 10–15 seconds every 10 minutes during sessions also provides relief on longer rides.
Q: Can indoor cycling cause injury if done incorrectly?
Yes — particularly overuse injuries to the knee, lower back, and hip flexors resulting from repeated incorrect movement patterns. However, the vast majority of indoor cycling injuries are entirely preventable with correct bike fit, proper form, adequate warm-up and cooldown, and progressive intensity increases.
Q: How do I know if my indoor bike is set up correctly?
After a correctly set-up session, you should feel no joint pain, no excessive lower back strain, no numbness in hands or feet, and no hip rocking. Your legs should feel appropriately fatigued in the muscles — glutes, quads, hamstrings — not in the joints. If discomfort appears in joints or connective tissue, reassess your setup before the next session.